
A: When decreasing in lace (or increasing for that matter) the most important thing to remember is to make sure every yo is paired with a decrease. Why? Well, a yo is an increase and if it is not paired with a decrease to keep the pattern balanced, things can get very ugly very quickly! Of course there are exceptions to every rule, but we aren't talking about those types of lace patterns here.
So, after doing the specified shaping, and a yo/decrease pair do need to be left out then what happens? Any extra stitches left over are then replaced with either knit or purl stitches (depending on the pattern you are working with - it's usually the ground stitch).
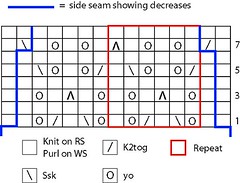
In the case of Guinevere (using size 33 for example) (click on any chart to enlarge):
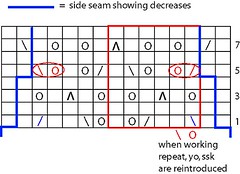
Here is chart 2 with the first 2 decreases marked out in blue.
The directions say: Dec Row: (RS) K1, ssk, work in pattern to last 3 sts, k2tog, k1.
But what does this really mean in terms of where you start your pattern on the chart?
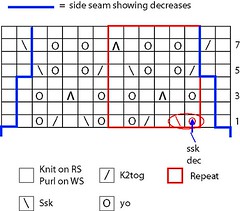
Looking at the chart, you have a k1, followed by a yo, ssk. That's not going to work because you need to add in a decrease. So this yo, ssk pair will need to be dropped.
And at the end, same thing. You need to slip in a k2tog decrease, but you have a yo, k2tog in your way. This yo, k2tog pair will need to be dropped.
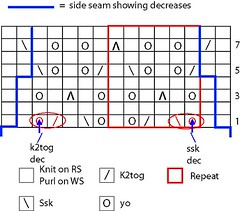
Now let's replace the dropped yo/dec pairs with what is actually happening:
So our first row now looks like this: K1, ssk, k2, k2tog, yo, k1, *yo, ssk, k1, k2tog, yo, k1, rep from * to last 7 sts, yo, ssk, k2, k2tog, k1. The k2 stitches in bold are added to take the place of the replaced yo/decrease pair we had to take out to keep the stitch count correct. (These stitches are circled in blue on the chart)
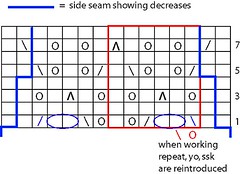
For row 3 the only change is we have one less stitch at the beginning and end. So instead of beginning and ending with 2 stitches, we now only begin and end with 1 stitch.
Now let's take a look at our next decrease at row 5:
Again, the first and last yo/decrease pairs are going to be in the way so they need to go.
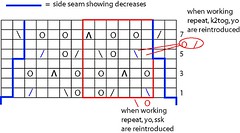
And here is our chart with the decreases added. So row 5 now looks like this: K1, ssk, k1, yo, ssk, k1, *k2tog, yo, k1, yo, ssk, k1; rep from * to last 6 stitches, k2tog, yo, k1, k2tog, k1.
Row 7 doesn't involved any decreases, but now because we've decreased 2 stitches on each edge, it still affects the pattern and the first and last yo pairs need to go:
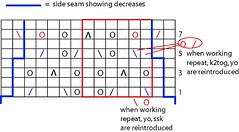
Row 7 doesn't involved any decreases, but now because we've decreased 2 stitches on each edge, it still affects the pattern and the first and last yo pairs need to go:
So for row 7 we now have: K3, yo, k1, sl1-k2tog-psso, *k1, yo, k2, yo, sl1-k2tog-psso, rep from * to last 4 stitches, k1, yo, k3.
And so on.
A tip to help keep track of the changing pattern:
On a piece of graph paper and with a pencil, mark out a few pattern repeats + the beginning and end stitches. Then mark in every decrease (like my blue side seam line in the charts above). Erase any yo/dec pairs that interfere with your shaping and add in your decreases and changes in pattern as needed.
Shaping in lace does take a little bit of practice, but with a little bit of patience, it will all start to make sense!
Other helpful resources:
- Majoring in Lace by Eunny Jang (part 3 talks about shaping)
- Beyond the Basics: A Primer in Lace by Jackie Erickson-Schweitzer (Interweave Summer 2006) Part I of article
- Beyond the Basics: Lace - Shaping Your Garment by Eunny Jang (Interweave Fall 2006) Part II of article


No comments:
Post a Comment