
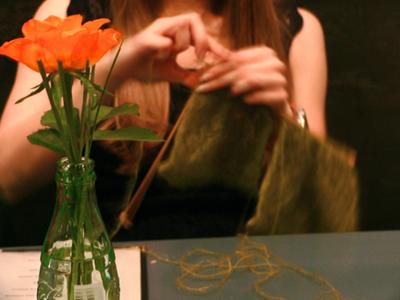
To make sure I get accurate gauge, I try to make my swatches a bit larger than normal - at least 6"x6". When knitting over a larger area, it's easier to knit at a normal tension that is comparable to actually working with a larger piece of knitting. I usually have a pretty good idea how many stitches to cast on to get at least 6" across and if I'm working in a pattern, I make sure to cast on the correct number of repeats + any extra stitches if needed. A larger gauge swatch also makes it easier to learn the pattern so I don't have to rely so much on a chart or written instructions once I get started on the actual garment.

Flame Chevron Stitch in Fable Handknits 100% Baby Alpaca
As you can see, my gauge swatch is all knit up, blocked and ready to be measured. It measures 5.75"x5.25" (32sts x 36sts total) which gives me a gauge of 5.5 sts and 7 rows per inch on US size 5 needles. I always make sure to double and triple check all the measurements and stitch counts - trust me - I found this out the hard way! Patience is key when working with gauge! Even though I'm usually anxious to get started on a new project, I try to let the swatch sit overnight and recheck the measurements when I get home from work. Also, late nights and figuring out gauge don't mix!
 So I have some stitch and row numbers to work with, but now what? This is where my rough schematic comes in.
I keep all my design info at hand in a small notebook I carry around everywhere. On the page opposite the schematic I keep all my gauge, needle and stitch information.
As you can see, I only have a few measurements written in for now. They constantly change as I knit the garment and the only thing I really need to worry about for the time being is how many stitches to cast on, how many rows of rib to work, when do my decreases need to start, how many do I have to do and how often. I know that sounds like a mouthful, but it's not too bad, really!
Since I've probably bored you enough talking about gauge, I think I'll save the math stuff for the next installment! Stay tuned!


8 comments:
This was not a lecture at all! It totally makes sense.
Great post. I love this series! You're gonna create a whole group of proteges:)
I've always admired your dedication to gauge checking. I wish I would take your advice!
Great second installment, Melissa. Even your swatches are beautiful! I'm usually really bad with gauge swatches. I've paid the price more than once for that, but I still haven't quite learned. I'm trying! ;)
Your gauge swatch is like a work of art!
This is fascinating - and perfectly clear! Thankyou for taking the time to explain it.
I loved this post. It was so helpful. I'll be anxiously awaiting your next installment!
Thank you!
Wow- I just love how this is turning out. The sweater and the tutorial. :)
I have started thinking more concretely about how fun it would be to design my own knits and you are making it seem more possible. yay!
I bet from this series we will see some new designers born.
Post a Comment