Hi There! Neoknits has moved!

If all works well, you should be automatically redirected to the new site in 10 seconds.

If that doesn't happen, please visit
http://www.neoknits.com

Don't forget to update your bookmarks and your RSS Feeds!

See you soon!

Wednesday, February 28, 2007

The Design Process - Math

Math, the bogyman of the knitting world! I'll try to explain the best I can, and I hope it is somewhat understandable. Instead of doing everything at once, I'll try to break it down into smaller pieces and only as I work on each section. My numbers tend to change as I'm working anyway, so this is probably the best way to go.

So we're back to the trusty schematic. I've added in a few more numbers since we last saw it:

To start, I needed to decide whether to make the sweater in one piece or three. I decided to make it in three pieces for two reasons: #1 Seams add more stability to a garment and #2 it would be difficult to continue in one piece when I got to the sleeve section.

With that decided, I can now begin to figure out my numbers.

To sum up the process in very simple terms, I need to multiply all the horizontal measurements by the stitch gauge and all the vertical measurements by the row gauge. But with this sweater, it's not quite that easy.

For example - Bottom hem: I want it to be 17 1/2" wide. Multiply 17.5 x 5.5 (st gauge)=96.25 sts. I round this down to 96 sts, but this still doesn't work. My lace stitch pattern is a multiple of 7 + 4 sts. This means that my cast on number must be evenly divided by 7 and then 4 sts need to be added to keep the pattern centered. So I play with my number and come up with 95 sts to cast on (95-4=91 then 91/7=13).

So I have 95 sts to cast on, right? Well, not really. I decided to start the hem with a 2x2 rib whose stitch multiple is 4 + 2 sts. In order to center the rib up correctly, I couldn't do a correct pattern repeat. I decided on 96 sts (k1, (p2, k2) to last 3 sts, p2, k1). When I get to the pattern portion of the body, I'll just need to decrease 1 st to get back to 95 sts for the correct pattern repeat. I make a note of this on my schematic so I don't forget.

Next I usually figure out the decrease and increase frequency along the side seams, but since this body is fairly straight, I haven't really decided on the decrease points yet. I decided to cast on and think about where these points may be as I go along.

I cast on for the back on Sunday night and I have about 11" done so far. I haven't quite figured out where I want to start my shaping yet. I'm also wondering if I should start increasing instead of decreasing as I originally planned........hmm. I better decide soon though, I really don't feel like ripping back because I've gone too far!

Stay tuned for more sweater progress and math! Can I hear everyone say "yay! math!"?


P.S. Speaking of numbers changing - at about 5" in I realized that my row gauge was actually 8 rows per inch instead of 7. I did recheck my gauge swatch in the beginning, but it just goes to show that you can't always rely on them 100%. Always check your knitting!
Thursday, February 22, 2007

The Design Process - Gauge

Let's talk about gauge. Now I know what some of you are thinking - ugh! not another lecture about gauge! Well, yes and no. When designing a pattern, a gauge swatch is the key to all my numbers. Without it I would be completely lost, have to rip back 50,000 times and would probably be committed to the loony bin before you could say "knit". So let's get started, shall we?

To make sure I get accurate gauge, I try to make my swatches a bit larger than normal - at least 6"x6". When knitting over a larger area, it's easier to knit at a normal tension that is comparable to actually working with a larger piece of knitting. I usually have a pretty good idea how many stitches to cast on to get at least 6" across and if I'm working in a pattern, I make sure to cast on the correct number of repeats + any extra stitches if needed. A larger gauge swatch also makes it easier to learn the pattern so I don't have to rely so much on a chart or written instructions once I get started on the actual garment.


Flame Chevron Stitch in Fable Handknits 100% Baby Alpaca

As you can see, my gauge swatch is all knit up, blocked and ready to be measured. It measures 5.75"x5.25" (32sts x 36sts total) which gives me a gauge of 5.5 sts and 7 rows per inch on US size 5 needles. I always make sure to double and triple check all the measurements and stitch counts - trust me - I found this out the hard way! Patience is key when working with gauge! Even though I'm usually anxious to get started on a new project, I try to let the swatch sit overnight and recheck the measurements when I get home from work. Also, late nights and figuring out gauge don't mix!

So I have some stitch and row numbers to work with, but now what? This is where my rough schematic comes in.

I keep all my design info at hand in a small notebook I carry around everywhere. On the page opposite the schematic I keep all my gauge, needle and stitch information.

As you can see, I only have a few measurements written in for now. They constantly change as I knit the garment and the only thing I really need to worry about for the time being is how many stitches to cast on, how many rows of rib to work, when do my decreases need to start, how many do I have to do and how often. I know that sounds like a mouthful, but it's not too bad, really!

Since I've probably bored you enough talking about gauge, I think I'll save the math stuff for the next installment! Stay tuned!

Tuesday, February 20, 2007

Two of a Kind

Look for part 2 of "The Design Process" soon, but in the meantime.......

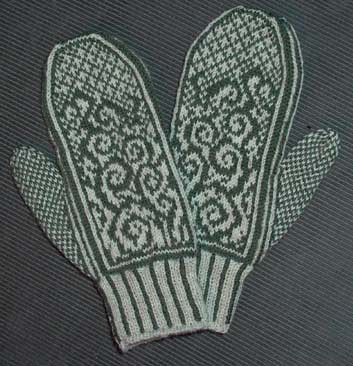
We have 2 finished Anemoi mittens!

anemoi mittens

Pattern: Anemoi mittens by Eunny Jang
Yarn: Fortissima Socka 1 ball Olive and 1 ball Cream
Needles: Size 0 and 1 dpns
Started: Jan 26th
Finished: Feb 19th

Pattern Notes: I just LOVE these mittens! Unfortunately I finished them just in time for the weather to warm up a bit! It was almost 50 degrees today! I'd hate to even say this, but......I hope we have a few more chilly days so I can wear them! The pattern was pretty straight forward, but I still don't know how Eunny managed to turn the mittens inside out with 2 dpns sticking out of the top to do the 3 needle bind off! The first time was all cursing, the second time I was smart enough to put the stitches on waste yarn. The first time was also done at 2am - not so smart.

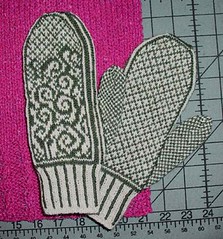
And why did my mittens take me so long? That is thanks to the pink thing they are sitting on, and I don't want to talk about it! Let's just say that the pink thing used to be a brown maternity sweater.....in a way. And no, I haven't found a magic way to turn dark brown yarn into pink either.

anemoi front & back

Monday, February 12, 2007

The Design Process - Inspiration

Welcome to my first installment of a glimpse inside my design process! I will begin with a very short summary of where I find inspiration and then talk a bit about sketching and swatching the initial design. I also include dates so you can get a general idea how long the process can sometimes take.

Working as a full-time designer, I am blessed with having tons and tons of inspiration surrounding me practically 24/7. We subscribe to trend and color services, shop Europe and NYC, and look at magazines. Sometimes I am inspired by a particular stitch, other times by a great silhouette or even by a great yarn.

In this particular case, I was inspired by some beautiful yarn - Fable Handknit's 100% Baby Alpaca. This yarn deserved to be turned into something that was classy and sophisticated, yet fun and up-to-date.

Finally in the beginning of January, I got around to sketching a few ideas here and there. I sketched about 10 designs and let them sit, looking over them occasionally. Finally they were narrowed down to about 4 and left to sit another few days. Usually, I will also get outside opinions of fellow knitters and designers to help me decide on the final project. I don't think the creative process should happen in a total vacuum, and comments from outside sources are a very helpful tool when making my final choice. And the winner was.........

A deep V tunic cardigan with short doleman sleeves (selected Jan 13th):

Once the design was chosen, I set to work trying to find a stitch pattern that both complimented the yarn and the silhouette - which is not always an easy task! After pouring over several stitch libraries, I selected a few to swatch. Sometimes they work, sometimes they don't. For this particular design, I picked about 5 stitch patterns and 2 worked with the alpaca.


I went for something with a little texture, but with a hint of lace (finished Feb 1st):

The top of the swatch was done in an interesting pointelle/rib like pattern. The bottom is Flame Chevron.

I carried the swatch around with me for about a week before finally deciding on the Flame Chevron. I thought it would work well with the design and add a bit of texture without being overwhelming. I really liked the top pattern also, but felt it might look a bit too busy, thick and vertical for a long tunic. So this stitch will probably become inspiration for another design down the road.

Inspiration - check.
Design - check.
Stitch pattern - check.

Next step: figuring out the gauge, yarn requirements, and the measurements of the finished garment. Stay tuned!

Thursday, February 08, 2007

New Design Project

I've been working on a new design for neoknits that I'll actually be able to share! The design has been in the works for a month or so, but I just finalized all the details today.

As I'm working on the project, I hope to be able to explain a little bit about what goes into creating a design, how long the process takes, and what type of snags can taunt you along the way. After being unable to share all my "secret projects" for so long, I hope this will be something that may interest a few of you out there.

So stay tuned! I hope to begin this little "design series" on Monday and update at least 2-3 times each week, depending on my progress. I'm sure other projects might interrupt, but I'll give it a good try!

And no, my other mitten isn't finished yet. Back to knitting!

Monday, February 05, 2007

Brrrrrr! Chilly Weekend!

The temperature just keeps falling, falling, falling and my mittens aren't getting knit quick enough! It took me just a few extra minutes getting out of the house this morning so I could get to work. Who likes 15 degree weather? Not me!

Yesterday, DB and I ventured out into the 28 degree weather to visit the Merchants House Museum and then some lunch and shopping in Soho. If you are into the Edith Warton era, you HAVE to go to this museum. The house was built in 1832 and purchased in 1835 by Seabury Treadwell. The house was sold in 1933 when the last surviving daughter passed away and has been a museum ever since. All the furniture, clothing and linens in the house were owned by the family and are original to the house. It is a time capsule that remained unchanged for almost 100 years while occupied!

Here is a bad picture of the outside, the sun wasn't co-operating and I was too cold to be a perfectionist!


Afterwards, we got a bite to eat and then headed over to Purl Patchwork. I couldn't resist getting some fabric for the Weekender Bag pattern I had bought last summer. I love the little bees and Anemoi does too! The polka dots will be for the lining and the straps.

I think I have become obsessed by sewing again. I spent all weekend looking through Sew U and dreaming of new clothes. I even went so far as to grab my patternmaking book and old notes from class at FIT. But it might be too early to tell, the machine is still yet to come out of the closet. I'll keep you posted on this one!

Friday, February 02, 2007

Mittens and a New Look

I was finally able to change over to the new blogger. Man, this so much easier! I'm in heaven. I was getting a bit sick of all the green anyway. I'm feeling the clean lines now.

I actually had some time this week for "free knitting", knitting for myself that is! This yarn was originally intended for Eunny's End Paper Mitts, but because of the recent cold snap, the Anemoi mittens just seemed much more useful at this time. I started them last Friday night and have made fairly good progress, but I want them done now!

There is tons more stuff going on behind the scenes which have kept my speedy fingers from finishing the mittens quickly. Lots of interesting stuff going on with One Planet, developing swatches for new designs, and sketching, sketching and more sketching!